|
I just got a new toy to tinker with at home (because even on my days off I'm not content to sit around and do nothing... I need a project to mess around with). Stick with me, there are money-saving and life-saving lessons in this.  My new hobby is a vintage Mark Twain speedboat from 1977, and it needs a little work. 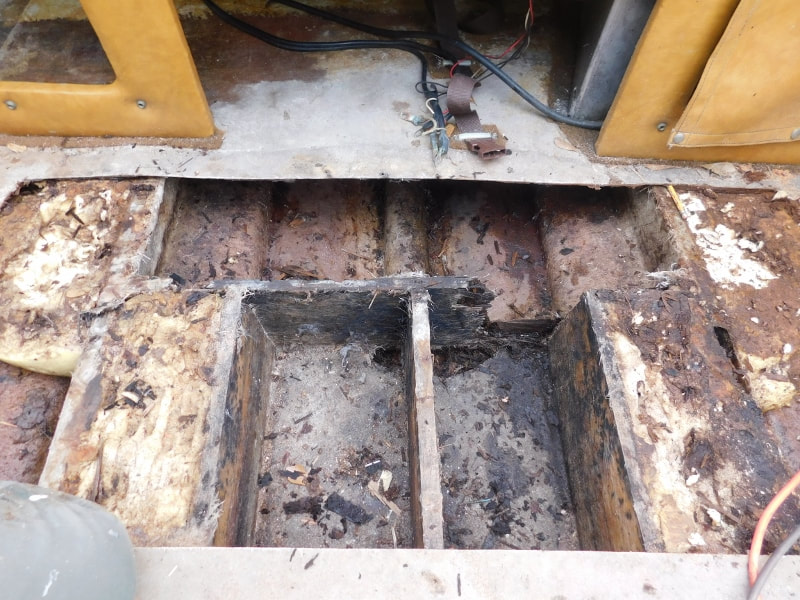 That is to say, all of the interior wood is rotten. I need to strip it all the way down to the hull and totally rebuild it. At first I was let down. This is a huge repair and I definitely won't have the boat on the water this summer. Just call me Captain Drydock. But once I got used to the idea, I got excited and started researching the right way to fix it. Now whenever I'm working on my custom cabinets and need to stop for a minute while the paint dries or the glue sets up, I'll hop in the boat and rip out the floor for half an hour. 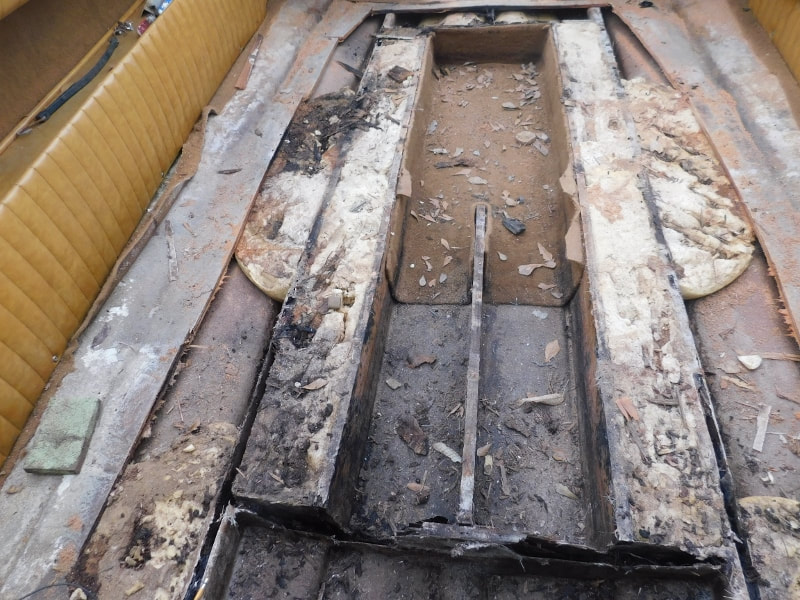 Since boating is a new world for me, I've been studying boating forums and Youtube channels to see how this kind of project is done. A lot of the guys doing the demonstration are hobbyists as well, and outside of boat remodeling, many of them don't have a lot of experience doing handyman or carpentry work. And there's a big mistake I've noticed amateurs making again and again when they DIY their boat repair: They use cheap materials. Think about it: you're about to spend the only resource you can't recover or get back... a resource that in some ways is even more precious than your money... your time. 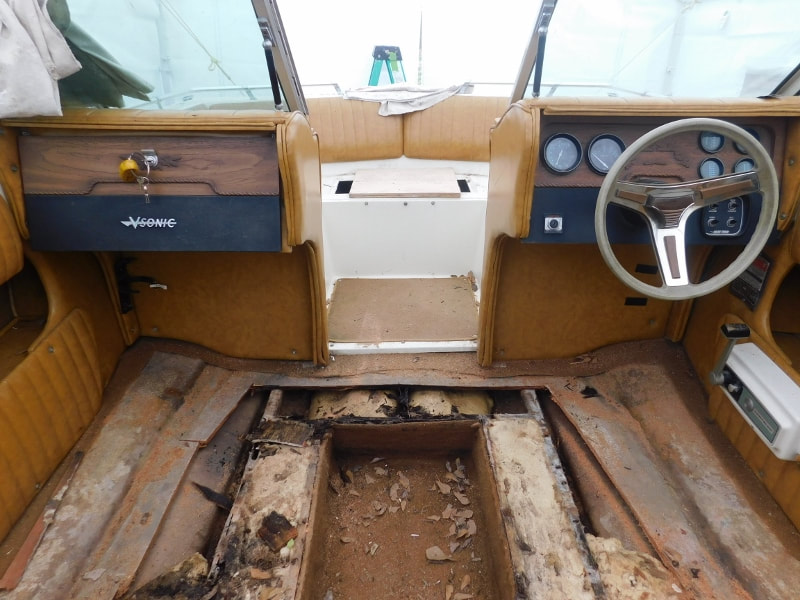 In the case of a total boat repair like this, you'd be spending about 300 hours of your life. Yet instead of choosing marine-grade materials that will last for a long time, some of these guys are using the cheapest plywood available and just trusting in their fiberglass coating to do the work. Since it's hard to add a perfect waterproof coating, changes are that the plywood is going to rot in ten years and all of that time will be wasted. And the money they spent on the cheap materials will be wasted, too. 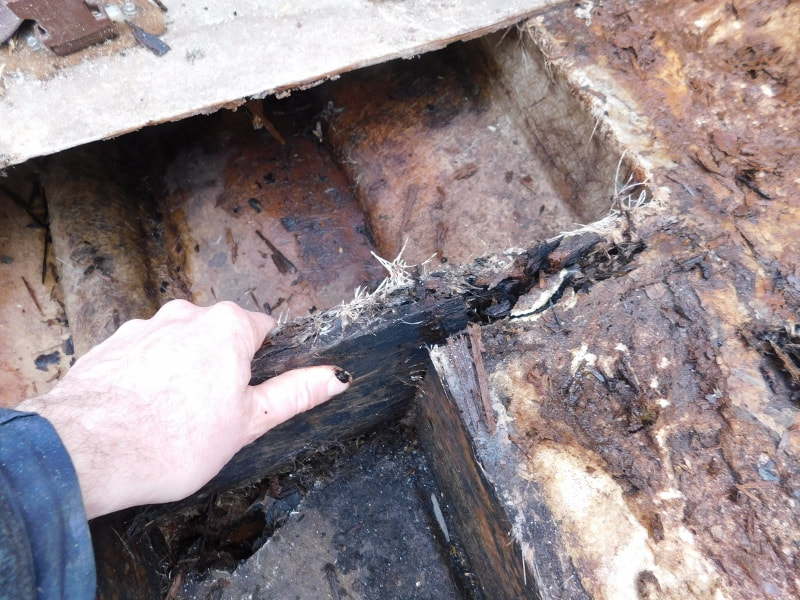 This is their plywood in ten years. And here's another mistake to avoid making... and this is one that even the pros make all the time... and it drives me crazy because it's really dangerous... They don't wear proper masks or safety gear. Heck, some of them don't even use ventilation! 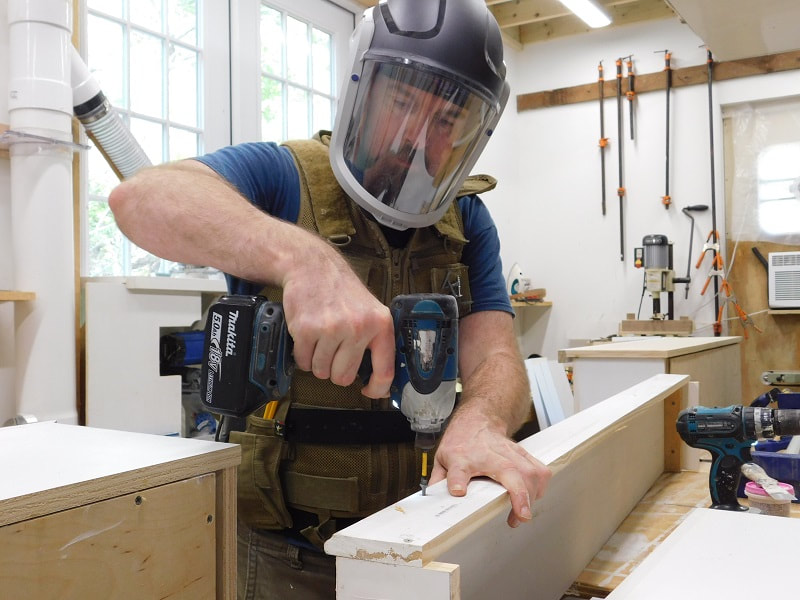 Your health is just as precious as your time. And wood dust causes cancer. When you breathe wood dust, you're basically breathing in silica (the stuff they make glass out of) and the worst part is, the most dangerous dust is the finest dust. It hangs in the air longer, you can't see it, and most masks don't filter it out. If you are going to DIY a project, always buy the best mask you can afford and work with the best available ventilation. That's why even though I have a professional workshop with the best ventilation I can buy...  ...I still leave the windows and doors open in good weather, and I wear my powered-air dust filter. Is it overkill? I have good reason to believe that it is not. I'm fortunate (if that's the word) to have an allergy to wood dust because I spent so many years breathing it in. If I expose myself to a dangerous cancer-causing level of dust, my body reacts as if I've just inhaled a handful of pollen. And if I don't wear my powered air mask and use good ventilation for even a few minutes of light sanding, I get that allergy. If you're not "lucky" enough to have a wood dust allergy, you can easily expose yourself to a dangerous level of carcinogens without ever knowing it. Don't believe me? Ask the American National Cancer Institute and the Canadian Center for Occupational Health and Safety. Those are just the first two that came up on my Google search. The evidence is there. And speaking of carcinogens, I have an outdoor work table which I like to use when painting, because even with low-VOC paint there can still be dangerous fumes, and I don't trust my spray booth to clear the air as well as a strong breeze. 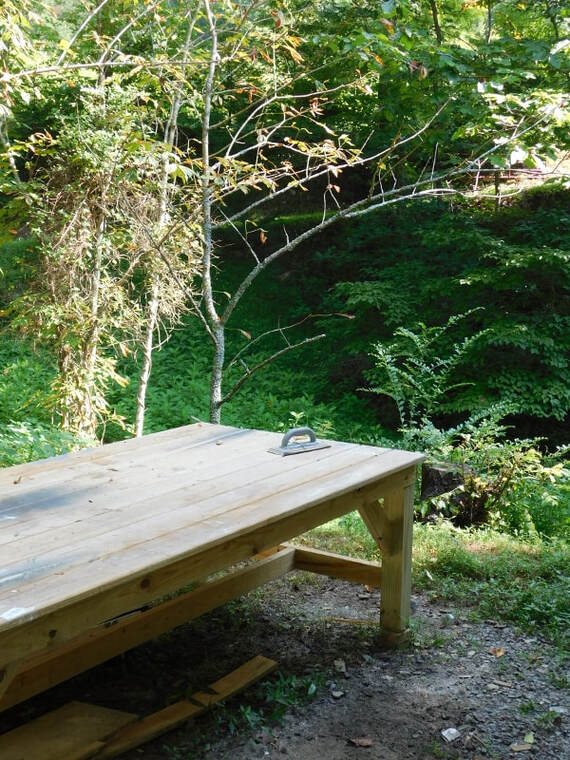 I'm not saying you shouldn't DIY your household projects. But don't save money at the expense of the more important things in life... the things you can't get back once they're gone... your time, and the health of you and your loved ones.  I filter the air so Faith can visit the shop safely. OK, I'll climb down off my soapbox now.
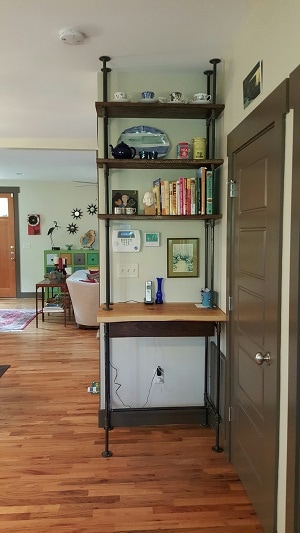
If you have a project that you'd like to DIY, but don't have the time, know-how or safety equipment, give us a call. We'll take care of it for you. August in Asheville is in full swing, and I think it must be ten years since I"ve seen such a cool and pleasant mountain summer. Perfect weather for getting out the motorcycle. 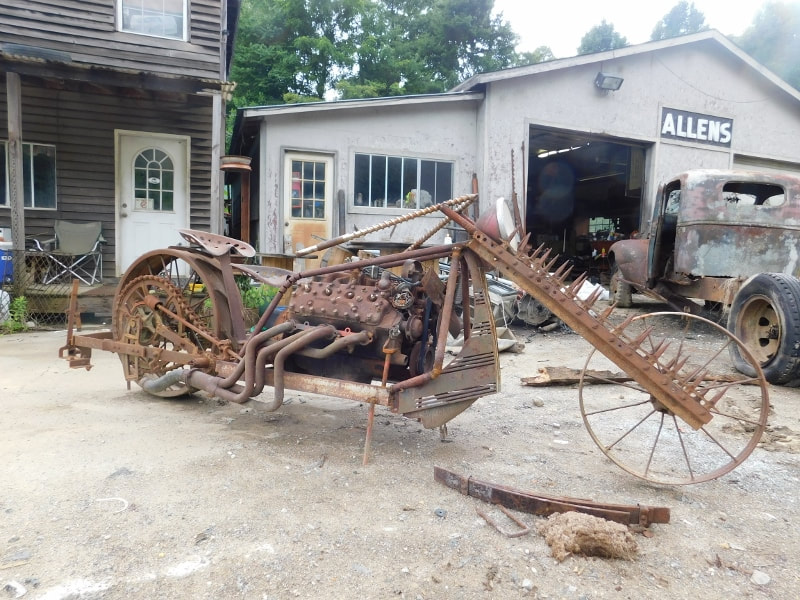 Well, maybe not that one. It only looks like a road warrior! That's from one of the local workshops. I was driving past one day and couldn't resist stopping for a photo. I believe they recycle metal, and clearly they've been putting their scrap to good use. Speaking of workshops, I thought I'd show you a peek behind the scenes at my cabinet shop. Because although we're still doing lots of handyman work in Asheville, I've been working on a couple of really cool woodworking projects as well. You're going to love these! Here's the shop... 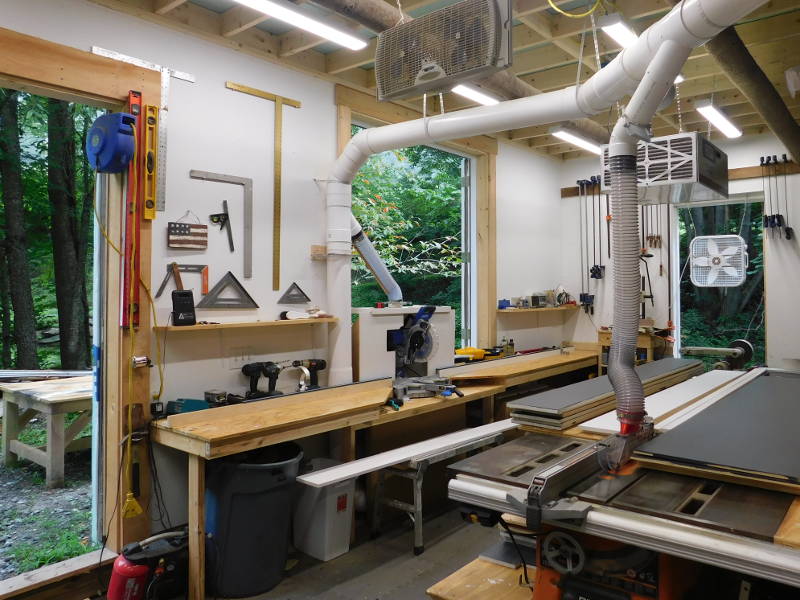 You can't tell, but there's a creek just outside the window. And there's nothing like turning off the ventilation system for awhile and letting Nature do the work while I assemble a few cabinets and listen to the creek rush by. I've even got an outdoor workbench in the shade for those really nice afternoons. Those gray boards eventually turned into a pair of bookshelves and a mantel to go around an electric fireplace. This is going in a brand new condo in downtown Asheville. I love these electric fireplaces because they don't require a chimney, so you can put them anywhere. 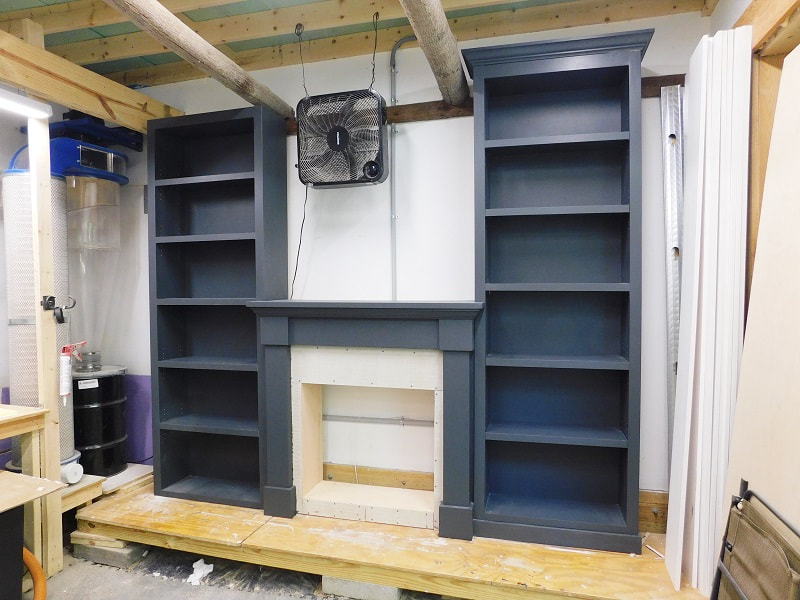 You might have noticed that I haven't added the crown molding or baseboard on one side. That's because the tobacco poles are getting in the way. That's right... my shop is built into an old tobacco barn. The poles aren't holding anything together... they're just there for sentimental value. Here's what the shelves will look like when they're installed. We create models like these for most of our handmade cabinets.... it gives you a chance to preview your project before we install it, so you can make changes and get exactly what you want.  Here's another view of the shop... I snapped this one a couple of weeks ago when I was working on another ventless fireplace. You can see it in the back of the room there. 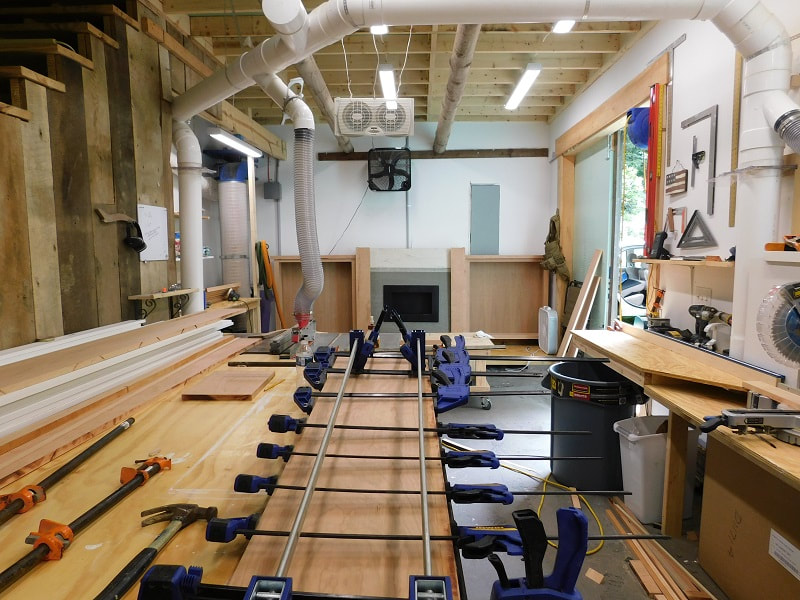 In the foreground you can see why every cabinet shop seems to have a million clamps! Believe it or not, I still plan to buy a few dozen more of them. Here's a pic of the fireplace mantel that I was clamping. It had a fiery cherry grain and it turned out really well. 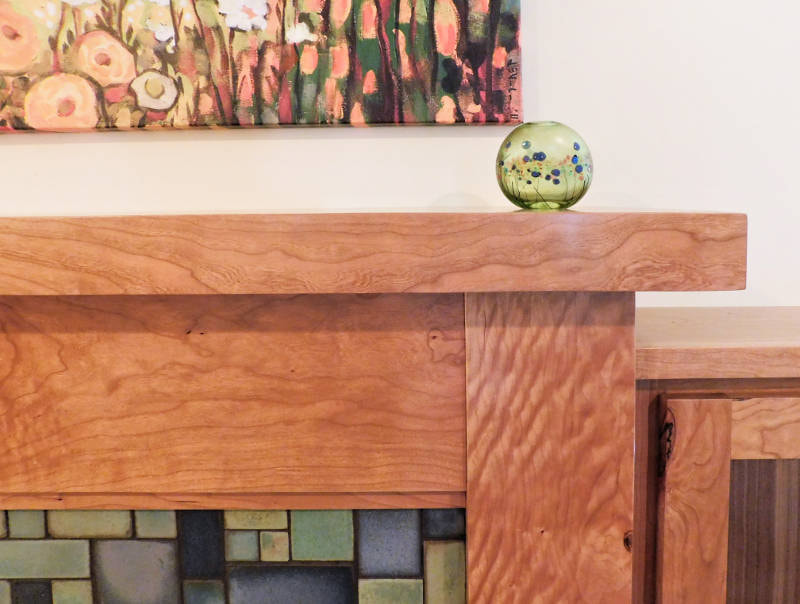 Yowsa! It looks great from a distance, too. The homeowner had a set of Craftsman tiles custom made just for this hearth. And as I said, this is another one of those chimneyless fireplaces, so it can go anywhere.  You can see more photos of this Arts and Crafts fireplace on our custom cabinets website. including the inside of the cabinet, which is hiding an entertainment center. It's a great way to disguise your TV. Or if you're here for handyman work, we can help you with that, too. Just give us a call.
I've been plugging away at this blog for 5 years or so, and I finally got the ultimate reward of blogging: FREE TOOLS!
A representative from Keson got in touch with me a few weeks back and asked if I'd like a free SOLA level to review. It looks like Keson is taking over the distribution of SOLA products in the USA, and they wanted to get the word out about their product.
I've had my levels for 20-odd years and they're getting pretty beat up, so I jumped at the chance. 
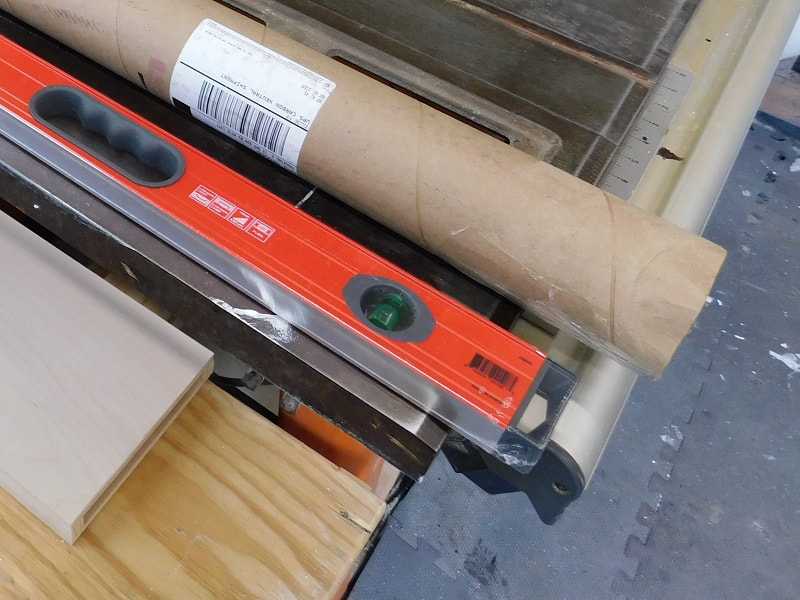
They bravely sent it to me in just a cardboard mailing tube. The level came with a handwritten note that said,
If our levels can survive the Postal Service, they can definitely thrive on the job site.
Ha! Well put. And it did come through in good shape.
Out of the box, the first thing I noticed was the bright red color. It's easy to lose tools on a busy job site, so this will be easy to find. 
I also noticed the rubber end caps.
Let me explain why this is great: when you're hanging a picture on a Sheetrock wall (for example) you have to be careful if you're using a solid metal level. One hard bump and you've dinged the wall and have to patch the ding.
No dings here, because I'm a pro, baby!
Anyway, the rubber end caps will make my job a little easier. Also, I can casually set it down on a floor without making a big loud CLANK, and it's easier on the level. So if you're sensitive about being careful with your level like I am, you'll be able to relax a little bit.
But the real star of the show is SOLA's patented vial technology. For one thing, the liquid in each vial is bright green with a big, clear bubble that stands out well and is easy to see. My vision isn't what it used to be, and I'm usually too busy to fool with eyeglasses when I'm on a job site, so this is a nice touch. And the shading on either side heightens the visibility as well. 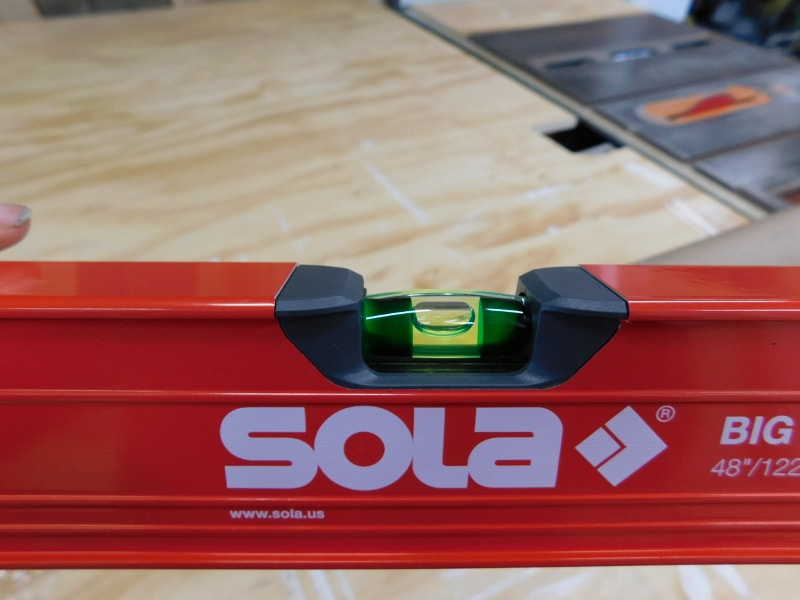
Also notice that the horizontal vial is notched into the side. On most levels you have to look through a little hole in the side, kind of like a port hole, and it gets kind of tricky to see, especially when you're holding it over your head. This one will be much easier to use.
And then there's this:

I assume this machined side has an important function, like resisting dings so your straight-edge stays straight. But I also like it because it's shiny.
Since it's been awhile since I went shopping for one of these, I dropped by the local Big Box hardware store to see what the competition looks like. I didn't see anything of the same quality. Certainly none of them had the little green vials with the great big bubble.
However, the Big Box levels had one thing in their favor: at about $15 to $50 in price, they cost a little less than the Big Red, which runs at about $57 according to Google. So if you're just starting to build your tool kit and need to cut costs, this might not be the right level for you. But the bottom line is that the SOLA Big Red Spirit Level lives up to its reputation: it's the equivalent of a custom red Karmen Ghia with a chrome-lined engine. 
Totally sweet.
If you need a handyman with all the tools, give us a call. We've got them. As a trim carpenter, I'm always looking for new ways to do a better job. One of the problems I regularly run into is breaking caulk lines, and I think I've finally found a solution. When I install trim, I caulk it where it meets the wall so that it looks continuous with the wall. If the caulk breaks, as it often does due to the natural movement of the wooden trim, it leaves a dark gap. Here's an example via Allan Bailey, one of the craftsmen in our network. On the left you can see trim which was installed a long time ago, where the caulk lines have all broken. In this example, the problem was caused by moisture from a poorly sealed shower door, but it can also happen when new trim is installed and dries out as it adjusts to the local humidity.  On the right, you can see where Allan has re-caulked and painted the trim. It looks much better, doesn't it? Caulk lines have such a high tendency to break that we don't warranty them on handyman work. But I do like to do things right, warranty or not, and that's where Big Stretch comes in. 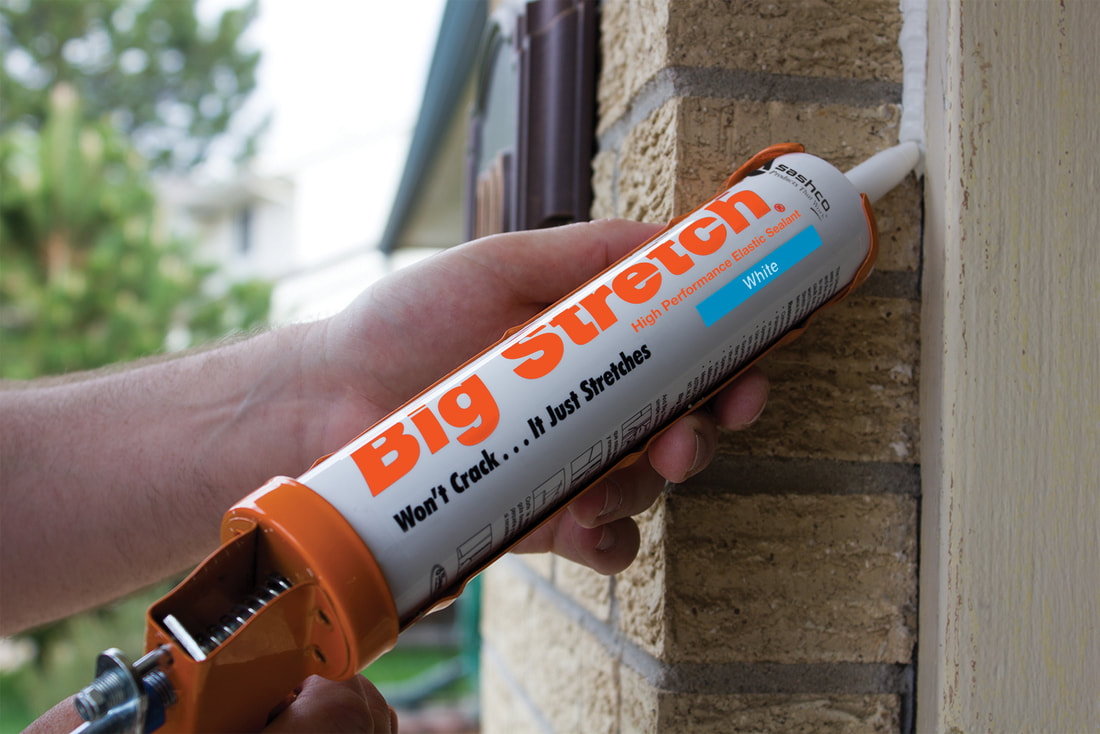 Image via sashco.com It's a new product by Sashco which supposedly resists moving and cracking. Here's a video to show the difference. (Warning: it's a little bit corny.) I've been putting Big Stretch to the test on some of the built-in furniture projects I've finished lately. On most of these projects, my goal is to install a piece that looks like it's part of the home, like these two benches which I installed on either side of an existing fireplace. 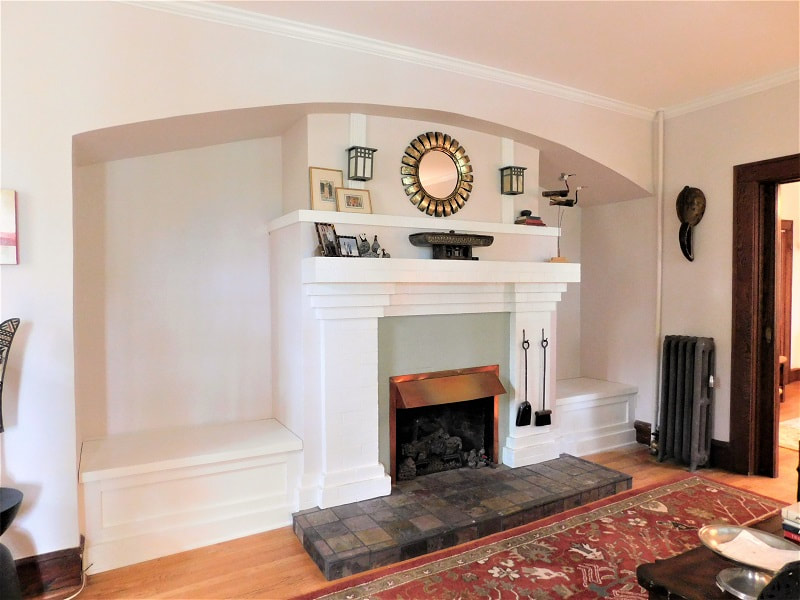 So far Big Stretch has held up well. 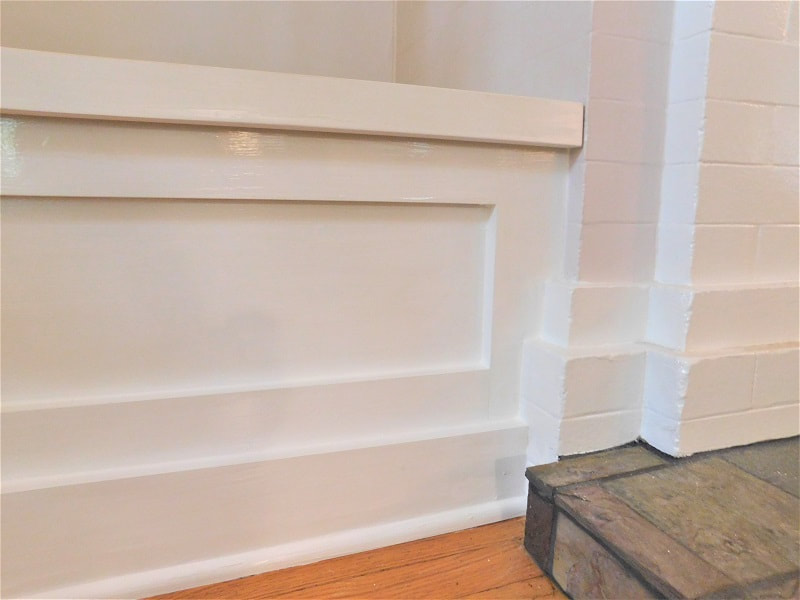 The only drawback I noticed is that although Sashco says Big Stretch is "easy to install, even for a novice," I find it to be a little trickier to work with than regular caulk. I usually like to go over my caulk lines with my fingertip to smooth them out. You can do that with Big Stretch, but you only have a few chances to get it right before it starts boogering up. But overall I'd give this a "thumbs up" rating. The superior performance outweighs the slight difficulty of installation. If you're looking for a handyman who loves to do things right, give us a call. We've got a whole network of craftsmen who are at least as picky as me. I was not compensated for this review.
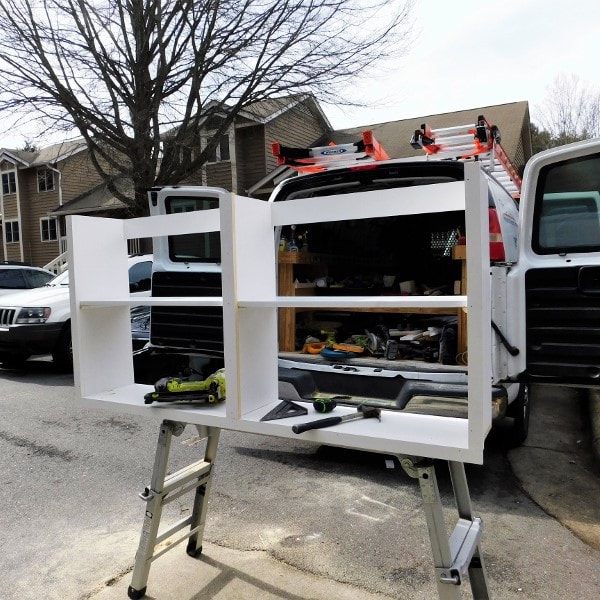
I usually use this blog to show off glamorous photos of my latest job, but today I thought I'd give you a peek behind the scenes. I've been getting a lot of built-in shelving jobs this year, and although I usually do a lot of prep work in my home workshop, there are often a few last-minute details to take care of onsite. It just makes for a better shelf if I can fit the piece to the space.
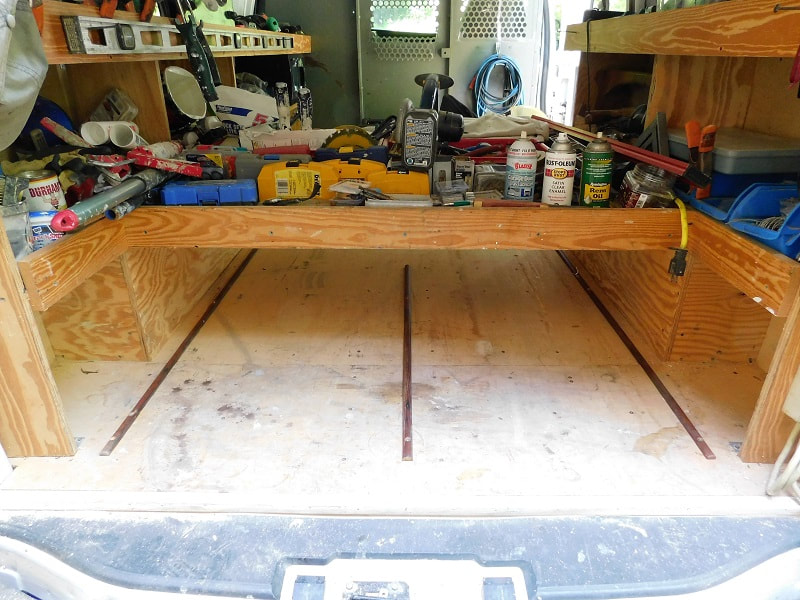
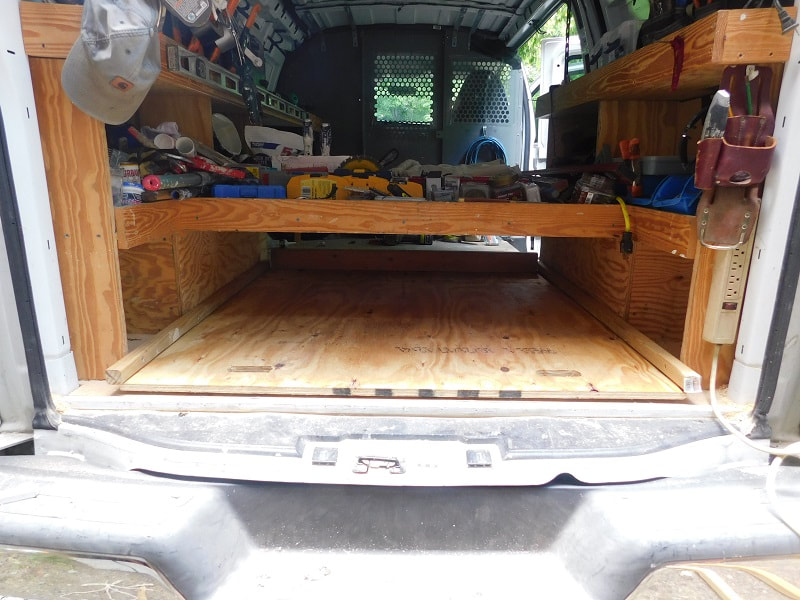
With that in mind, I'm always tinkering with the setup in my van, and I recently hit upon an awesome set-up!  When I first got the van, I built a set of custom shelves in an H layout that puts all of my tools right at my fingertips. There's always been space underneath for carrying plywood or painting supplies. 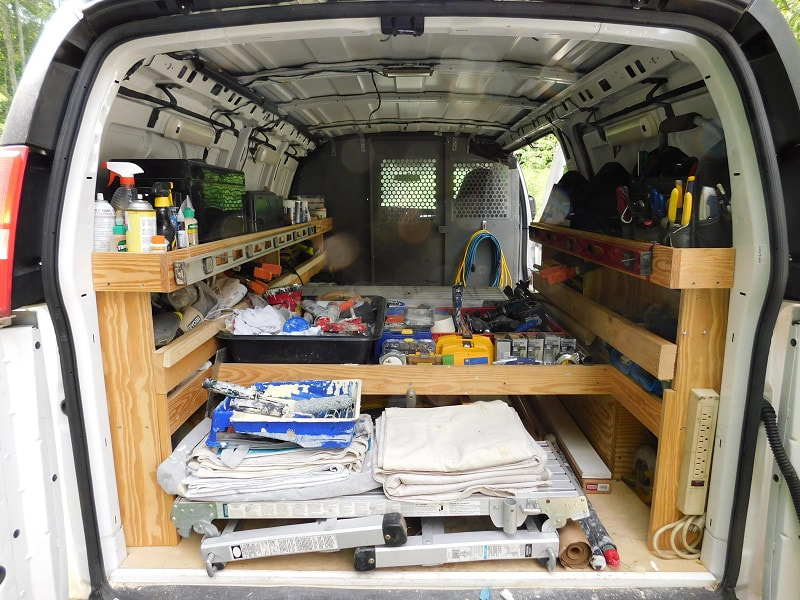 My latest brain wave was to install a drawer under the shelves. First I laid down some simple runners made from leftover pieces of half-round trim. Then I greased them and laid plywood over them. I added some runners above to hold the plywood in place.
My table saw fits there perfectly, and it even doubles as a counter.  When the drawer is pulled out, voila! A rolling workshop. 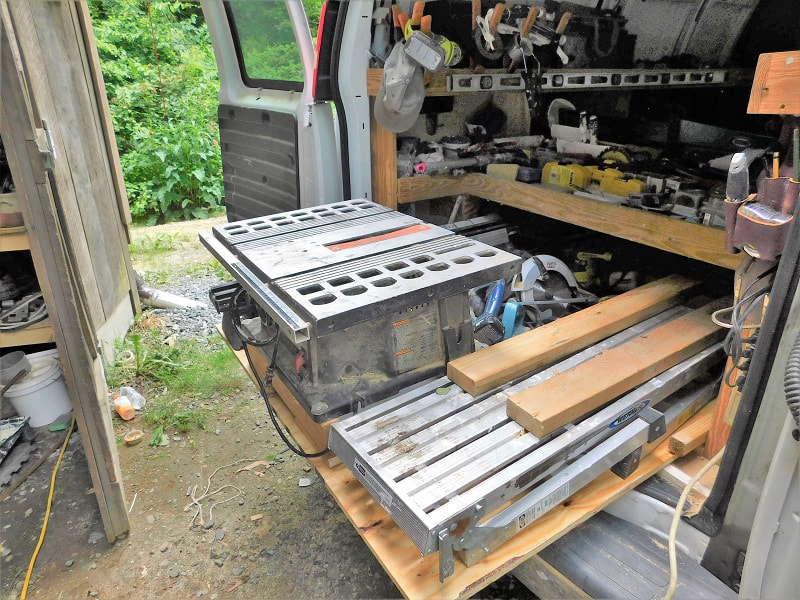 All of that organization is for you, so your special project is done right. 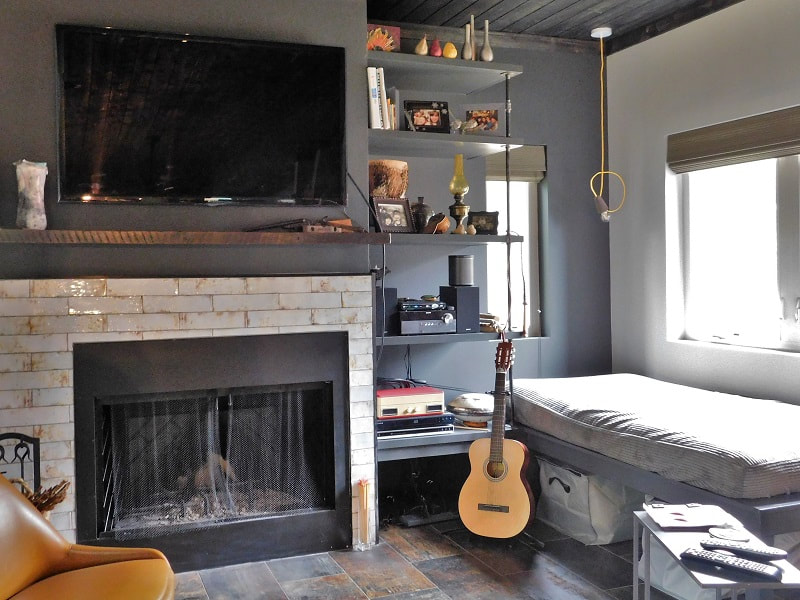 Industrial-style Built-in Daybed & Entertainment Center If you need someone with a rolling closet full of tools to pull up to your door and get your projects done, give us a call. We love this stuff!
|
About

Welcome to my blog! This is a chronicle of the adventures of Arthur Teel, a handyman working in Asheville and Weaverville, NC. Need someone to fix your home?
Connect!
Archives
April 2022
This blog is for entertainment purposes only. See our Terms of Use for details.
|
The current turn-around time for our interior painting team is 2 weeks.
Our handyman team is currently fully scheduled and not taking new projects.
What Our Clients Are Saying
"Arthur is that rare professional handyman who is totally reliable; fairly priced; pro-active in communications; honest; punctual; skilled -- and a really nice guy." "Arthur is a great resource to have here in our area. He's prompt, professional, does great work and is cost effective. I'll definitely use him again!" |
Follow Us:Email US AT:Service Area:
In-town Asheville
Mars Hill and Weaverville Arden and Fletcher Fairview Popular Services |

|